These are the detailed steps needed to install Syspro 7 Server on a Windows computer, preferably Windows Server, although Syspro 7 will suffice.
The installation is actually very easy - you would normally simply accept all the default values, and you normally wouldn't need the rest of this document, except when you hit the occasional problem.
From the Syspro 7 installation CD, run Autorun.exe, then click Server Installation, as highlighted in the screen shot below:

Click Syspro 7:

Select all the components you want installed:

If you are upgrading from Syspro 6.1, you may get asked to close some programs.
Before you do, BACKUP your Syspro 6 WCF Communications Service configuration file, as Syspro will remove the Syspro 6 Communications Service. This is because the Syspro 7 Communications Service is backwards compatible with the Syspro 6 one, but your config file gets deleted.
My config file was in C:\SYSPRO\SYSPRO Communication Service\SYSPROCOMMSService.exe.config.
Then click Yes:

Click Yes to install the Syspro 7 Runtime:

If you are doing an upgrade from an earlier version of Syspro, you may get asked the following; answer Yes:

Click Next:

Accept the licence agreement and click Next:

Decide whether you want to do an upgrade or a new installation, and click Next:

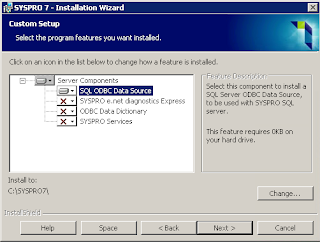
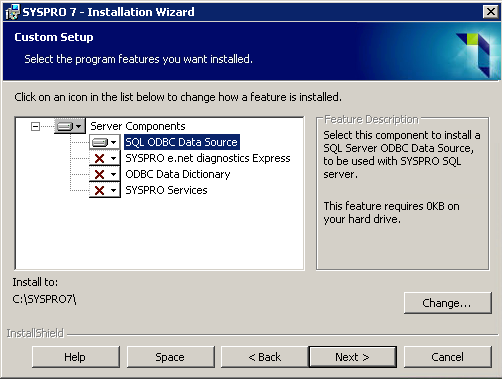
Select the components you need to install. You would not normally select any of these components as they have been superceded by Syspro WCF, Syspro Communications Service, etc.
Note for Syspro 7 RC010: you may wish to install the SQL ODBC Data Source so that you can connect to your database via ODBC, as you can't use the direct SQL Server conneciton as there is a bug in Syspro 7 whereby, when the direct SQL Server's connection string's UID is left blank.

If installing the ODBC connection, you will get asked for connection information:

Click Install:

After a while you will get this screen; click Finish:

Next you get prompted to install the Syspro Communication Service (recommended):

Select the directory where you want to install the Syspro 7 Communications Service. If you are installing multiple versions of Syspro in the same machine, you may wish to use a directory that won't overwrite an existing installation. Then click Next:

Click Next:

Click Close:

When done, click Exit:


Set the password for the Administrato. It is advisable to set a password!

Select the type of database you want to use. Normally, you'd want to just select All companies are SQL Server based:

Alternatively, you might selected a mix of SQL Server and ISAM databases:

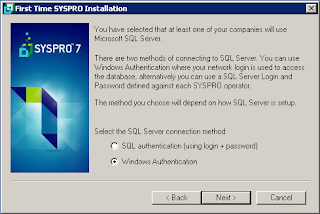
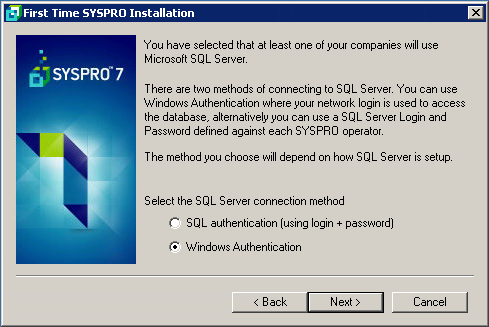
Select what sort of authentication you want to use.

However, as of Syspro 7 RC009, there are bugs in the use of SQL authentication whereby the connection string leaves the UID blank, and using the ODBC Data Source doesn't seem to work either, so you should select Windows Authentication, or use RC010 which has fixed this problem.
Note that to get Windows Authenticaiton to work, you will have to:

Enter a SQL Server Login name and password. You should create a login name such as "syspro"; it's bad practice to use the "sa" login. Tick "All SYSPRO operators will use this SQL Server login".

Enter your connection string for SQL Server.

Note that there is temporarily, in the release candidate, a problem with using connection strings - there is an error in COMLGN were Callbo does not work (and SRS), so you should use a System Data Source Name (DSN).
If you are connecting via a DSN, then you will need to manually create an ODBC data source first, unless you selected to install the SQL ODBC Data Source as part of the installation earlier.
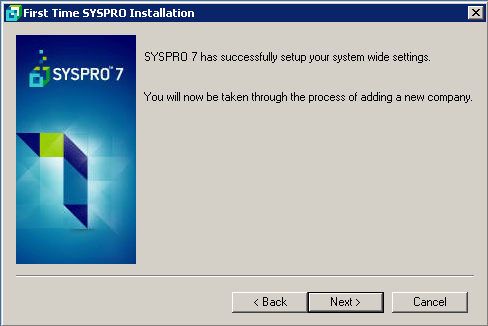
Enter the name of the Syspro system-wide database; you'd normally leave this unchanged as Sysprodb:

The ensuing steps are fairly straight forward and so are not listed in detail here.
__________________________________________________________________________
If you hit an error such as:
Message: Incorrect open mode for fle type
Access: Attempting to open a file
File name: C:\SYSPRO7\WORK\IMPACT.INI
Status: 37
Program: IMPNEW - Admin First Time SYSPRO Installation

then you may need to give additional permission on the Syspro WORK directory, as shown in the screen shot below:

__________________________________________________________________________
The installation is actually very easy - you would normally simply accept all the default values, and you normally wouldn't need the rest of this document, except when you hit the occasional problem.
1. Installation
From the Syspro 7 installation CD, run Autorun.exe, then click Server Installation, as highlighted in the screen shot below:

Click Syspro 7:

Select all the components you want installed:

If you are upgrading from Syspro 6.1, you may get asked to close some programs.
Before you do, BACKUP your Syspro 6 WCF Communications Service configuration file, as Syspro will remove the Syspro 6 Communications Service. This is because the Syspro 7 Communications Service is backwards compatible with the Syspro 6 one, but your config file gets deleted.
My config file was in C:\SYSPRO\SYSPRO Communication Service\SYSPROCOMMSService.exe.config.
Then click Yes:
Click Yes to install the Syspro 7 Runtime:
If you are doing an upgrade from an earlier version of Syspro, you may get asked the following; answer Yes:
Click Next:

Accept the licence agreement and click Next:
Decide whether you want to do an upgrade or a new installation, and click Next:
Select the components you need to install. You would not normally select any of these components as they have been superceded by Syspro WCF, Syspro Communications Service, etc.
Alternatively, you might select to install the SQL ODBC Data Source:
If installing the ODBC connection, you will get asked for connection information:
Click Install:
After a while you will get this screen; click Finish:
Next you get prompted to install the Syspro Communication Service (recommended):
Select the directory where you want to install the Syspro 7 Communications Service. If you are installing multiple versions of Syspro in the same machine, you may wish to use a directory that won't overwrite an existing installation. Then click Next:
Click Next:
Click Close:
When done, click Exit:

2. Setup
After Syspro has been installed, you need to set it up. To do this, run Syspro 7 from your Start menu on your server. You should see a welcome screen like this; click Next:
Select the Nationality and Date Format:
Select the type of database you want to use. Normally, you'd want to just select All companies are SQL Server based:
Alternatively, you might selected a mix of SQL Server and ISAM databases:

However, as of Syspro 7 RC009, there are bugs in the use of SQL authentication whereby the connection string leaves the UID blank, and using the ODBC Data Source doesn't seem to work either, so you should select Windows Authentication, or use RC010 which has fixed this problem.
Note that to get Windows Authenticaiton to work, you will have to:
- Set your SQL Server to use Mixed-Mode: in SQL Server Management Studio, right-click on your server and go to Properties; go to the Security tab; set Server authentication to SQL Server and Windows Authentication mode.
- Give your Windows login sysadmin rights: in SQL Server Management Studio, expand your Server, then under Security, right-click on Logins and select New Login. Enter your Login name. Go to Server Roles and tick sysadmin.

Enter a SQL Server Login name and password. You should create a login name such as "syspro"; it's bad practice to use the "sa" login. Tick "All SYSPRO operators will use this SQL Server login".
Enter your connection string for SQL Server.
Note that there is temporarily, in the release candidate, a problem with using connection strings - there is an error in COMLGN were Callbo does not work (and SRS), so you should use a System Data Source Name (DSN).
If you are connecting via a DSN, then you will need to manually create an ODBC data source first, unless you selected to install the SQL ODBC Data Source as part of the installation earlier.
Enter the name of the Syspro system-wide database; you'd normally leave this unchanged as Sysprodb:
The ensuing steps are fairly straight forward and so are not listed in detail here.
__________________________________________________________________________
If you hit an error such as:
Message: Incorrect open mode for fle type
Access: Attempting to open a file
File name: C:\SYSPRO7\WORK\IMPACT.INI
Status: 37
Program: IMPNEW - Admin First Time SYSPRO Installation

then you may need to give additional permission on the Syspro WORK directory, as shown in the screen shot below:
__________________________________________________________________________
Hi,
ReplyDeleteAnother awesome post. i wanted to request if you can please make a post on Standalone ODBC (USQL) installation for SYSPRO 6.1 SP1 or SYSPRO 7. i would highly appreciate it.
Best Regards,
ih khan